Here’s a pictorial guide – how to grip and wrap a Jones Loop H-bar®
4/21/2016 Update: This is how we wrapped the H-Bars before we had full-length grips. We now have full-length grips, available in the store. Please check out the H-Bar manual for more information on how to set up the H-Bars.
Start with the handlebar clamped in a stem either in the bike, or on a bike in the stand. I normally do it on the bike in the stand. Put the shifters on first, or just the brake levers if you’re just running a singlespeed. But for gears, shifter (rapid fire, thumbies) on first then the brake lever. I wait until I have the bars on the bike and the bike on the floor to find the final lever/shifters positions so I have the angle correct for riding positions.

Next job is the grip. A cardboard (or paper) screen/shield will prevent overspray of the glue getting all over the bars, bike, levers or stand.

3M Super 77 spray adhesive is a very good grip adhesive. It’s waterproof, holds the grips on really well.

I’ll spray the glue on the handlebar and inside the grip.

I’ll poke a hole in the end of the grip so when I slide the grip on to the bars there is somewhere for the excess glue to go.

Then spin the grip on so the glue is spread around inside everywhere. You might need to do this quickly to ensure you get the grip all the way on before the glue starts to set. Be sure it is pushed on all the way so the end of the grip is not loose.

Setup the bike on the ground now and set the brake levers where you like them. They should feel very natural and easy to reach from the rear/wide/downhill position. You should be able to reach them with one finger. Here the levers are a little too far away so (in this instance) I’ll adjust them.

I’m using an allen key here to set the reach adjustment. I find most people, even if you have large hands, need to bring the lever in closer to make it easier to reach them from this rear/wide position in a more relaxed way – not really stretching for it. Think about the reach adjustment.


Taping – I use the Cinelli cork handlebar tape but you might have your own preference.
You’ll need to cut some strips of handlebar tape to fit between the brake lever and the grip. This provides a seamless transition between the grips and the bars so you’re not stuck on the grip position all day long. You need to be able to move your hands around the H-bars easily.


Put a little electrical tape to hold those pieces in place while you start your wrapping. You want to smoothly fill the space here and ensure the final tape will sit level with the grips. If you are fitting ESI Silicon grips you might want to request some custom lengths to exactly match your grip space.


I start my wrap overlapping on the grip a little and then overlap that too. Running it tight. Over the brake lever


Around the corner like so and finish it all off (right up to the stem if you wish or you stop before) with a little electrical tape. It often helps to cut the bar tape at an angle to ensure an even end.
Now you have a handlebar you can hold on to in many different positions.
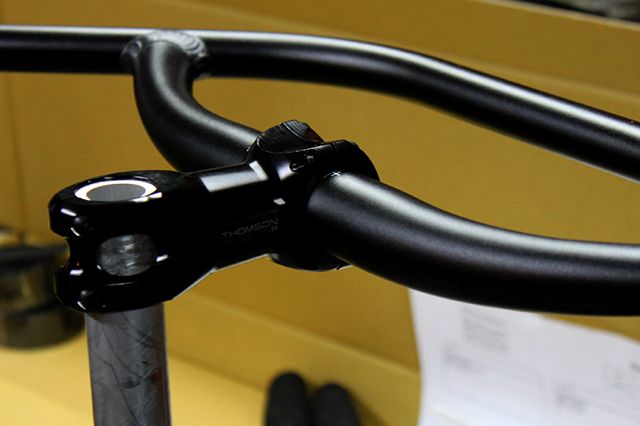
This H-bar was sent out to a customer like you see it here. US customers can order an H-bar complete with levers (and a Thomson X4 stem) all ready gripped and wrapped (by me) if they want a ‘ready-to-ride’ solution.


And of course this guide will let everyone else sort their H-bars perfectly for themselves!
4/21/2016 Update: This is how we wrapped the H-Bars before we had full-length grips. We now have full-length grips, available in the store. Please check out the H-Bar manual for more information on how to set up the H-Bars.


Perfect timing. I just received my H-Bar, grips and tape today in the mail. Thanks Jeff!
Ack! A couple days late, in my case. Good to read for next time.
I have a question about fitting an h bar. I’m 6’7″ and am riding a surly moonlander 24″. For my initial setup of the H loop bars, I used a stem that was an identical length to the stock stem from surly. After a few rides, I feel like I might benefit from a stem that is a centimeter or two shorter so that the xc/honk, forward and aero positions are not so reachy and the downhill position lets me get further behind the saddle. Do you have any general guidelines for how to fit the reach of the H bars?
BTW, I love them. They are so much more comfortable. I’m going from sore hands after a three hour ride to pain free.
You probably will benefit from a shorter stem. I designed my bars with my bikes that have a shorter reach to the bars than normal. So if you use my bars on a bike with a normal (longer) reach, a shorter stem can correct things. You are right to think that this will reduce the pressure on your hands and make it easier to use the forward grip positions.
I am 6’ and my bike has a 23” effective top tube length with a 72 degree seat tube angle and I use a 90mm stem with the Loop H-bar.
Also you can use a set-back seat post to move your weight back (along with the shorter stem) more on to your feet and less on your hands. With less pressure on your hands, you can use all the hand positions better and more comfortably and you will be in a better position to absorb bumps.
Feel free to call me and we can go over your bike set-up and fit for how and where you ride. I can help with estimating stem length and answer any questions.
I’m glad you are enjoying the bars!
Thanks,
JJ